Daftar Isi ⇅
show
Configuring Wi-Fi Settings Through 192.168.l00.1
Configuring Wi-Fi settings through 192.168.l00.1 is essential for optimizing your home network. This private IP address serves as the gateway to your router’s settings, allowing you to manage various aspects of your wireless connection. Whether you want to change your network name (SSID), enhance security, or adjust performance settings, accessing this interface is crucial. Understanding how to navigate the router’s configuration page empowers you to create a secure and efficient Wi-Fi environment. This guide will provide step-by-step instructions on accessing your router, configuring Wi-Fi settings, and optimizing your network performance for a seamless internet experience.
What Is 192.168.l00.1 and Why Use It for Wi-Fi?
192.168.l00.1 is a common private IP address used by many routers, serving as the default gateway for accessing router settings. This IP allows users to configure various network options, including Wi-Fi settings, security protocols, and device management. Using 192.168.l00.1 for Wi-Fi configuration is important for customizing your network according to your needs. It provides control over critical parameters such as SSID, passwords, and encryption methods. Accessing this interface helps ensure your network runs smoothly and securely, reducing vulnerabilities to unauthorized access. Familiarity with this IP address is essential for anyone seeking to optimize their home or office wireless network.
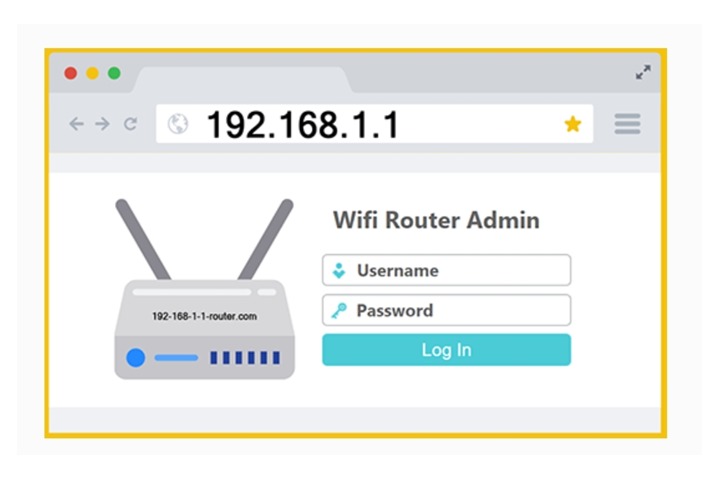
How Do I Access the 192.168.l00.1 Login Page?
Step-by-Step Process to Access the Login Page
To access the 192.168.l00.1 login page, ensure your device is connected to the router’s network. Open a web browser and type “http://192.168.l00.1” in the address bar, then press Enter. This action should redirect you to the router’s login interface. If the page does not load, verify that you are on the correct network and that the IP address is entered correctly. Ensure your router is powered on and functioning. Once on the login page, you will see fields for the username and password. Enter your credentials to proceed to the settings dashboard. If you encounter issues, restarting your device or router may help.
Default Credentials for Router Login
Most routers using the IP address 192.168.l00.1 have default login credentials. Common usernames include “admin,” “user,” or variations depending on the manufacturer. Default passwords may be “admin,” “password,” or left blank. These credentials are often printed on a sticker on the router or included in the user manual. If you cannot access the login page with these defaults, check your router’s documentation for the specific combinations. If you have changed these credentials and forgotten them, you may need to reset the router to factory settings. Remember that using the default settings without changing them poses security risks, so it’s crucial to create a strong, unique password after logging in.
Troubleshooting Access Issues
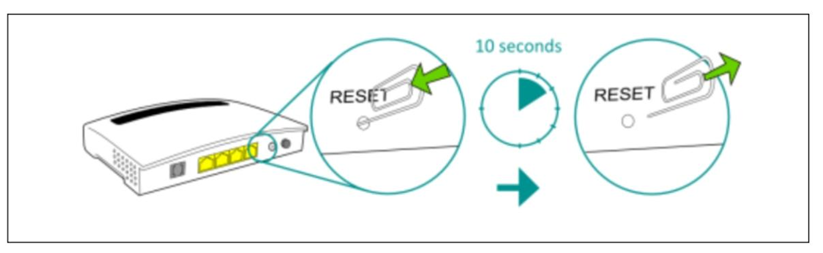
If you cannot access the 192.168.l00.1 login page, several troubleshooting steps can help. First, ensure that your device is connected to the router, either via Wi-Fi or Ethernet cable. If you’re connected but still can’t access the page, double-check that you’ve entered the IP address correctly. Clear your browser’s cache or try a different web browser, as this may resolve loading issues. If the login page still doesn’t appear, restart both your router and device to refresh the connection. Additionally, confirm that your router is powered on and functioning properly. If you suspect a forgotten password, consider resetting the router to regain access.
What Wi-Fi Settings Can I Configure?
Changing SSID and Network Name
After logging into 192.168.l00.1, one of the first settings you may want to configure is the SSID (Service Set Identifier). The SSID is the name of your Wi-Fi network and is what users see when they search for available connections. To change it, navigate to the wireless settings section of the router’s interface. Look for the SSID field, where you can enter a new network name. Choose a unique name that does not reveal personal information to enhance security. After entering the new SSID, save your changes. Keep in mind that all devices connected to the network will need to reconnect using the new SSID.
Updating Wi-Fi Password for Enhanced Security
Updating your Wi-Fi password is crucial for maintaining network security. In the router settings accessed via 192.168.l00.1, locate the wireless security settings. Here, you can change the password that protects your network. Choose a strong password that combines upper and lower case letters, numbers, and special characters. Avoid using easily guessed information, such as birthdays or common phrases. After entering the new password, save the changes to apply them. Remember that once you change the password, all devices previously connected to the network will need to be updated with the new password to regain access.
Adjusting Wireless Channels and Frequencies
Adjusting the wireless channel and frequency settings can significantly improve your Wi-Fi performance. Most routers operate on 2.4 GHz and 5 GHz frequencies. In the router settings interface, navigate to the wireless settings section, where you can select the desired frequency band. Choosing the 5 GHz band can offer faster speeds and less interference, although it has a shorter range. Additionally, you can select a specific wireless channel to minimize congestion, especially in areas with many neighboring networks. Channels 1, 6, and 11 are recommended for 2.4 GHz networks to avoid overlap. Save your changes to optimize network performance.
How to Optimize Wi-Fi Performance?
Choosing the Right Channel for Your Network
Selecting the appropriate channel for your Wi-Fi network is essential for minimizing interference and optimizing performance. Most routers automatically select a channel, but manually choosing the right one can yield better results. Use a Wi-Fi analyzer tool to identify the channels being used by neighboring networks. Channels 1, 6, and 11 are the most commonly recommended for 2.4 GHz networks, as they do not overlap with each other. For the 5 GHz band, there are more channels available, reducing interference further. After selecting the best channel in the wireless settings of your router, save the changes to enhance your network’s stability and speed.
Implementing Quality of Service (QoS) Settings
Quality of Service (QoS) settings help prioritize bandwidth for specific applications or devices, ensuring a smoother experience for critical tasks like gaming or video streaming. In the router’s settings accessed through 192.168.l00.1, look for the QoS section. Here, you can set rules to prioritize certain devices or types of traffic. For example, you can allocate more bandwidth to your gaming console or streaming device while limiting the bandwidth for less critical activities like file downloads. Configuring QoS can significantly improve the performance of high-demand applications, reducing lag and buffering issues during peak usage times.
Tips for Enhancing Wi-Fi Signal Strength
Enhancing your Wi-Fi signal strength can significantly improve your internet experience. Start by placing your router in a central location within your home to maximize coverage. Avoid placing the router near walls, metal objects, or electronic devices that can cause interference. Consider using a Wi-Fi extender or mesh network system to eliminate dead zones and boost signal strength in larger areas. Adjusting the router’s antennas, if applicable, can also help direct the signal where it’s needed most. Additionally, regularly updating your router’s firmware through 192.168.l00.1 ensures optimal performance and security, as manufacturers often release improvements.
Conclusion
Configuring Wi-Fi settings through 192.168-l00-1 is vital for optimizing your network performance and security. By understanding how to access the router settings, change your SSID, update passwords, and adjust wireless channels, you can create a more secure and efficient network. Implementing strategies like choosing the right channel, applying QoS settings, and enhancing signal strength further improves your Wi-Fi experience. Regularly monitoring and adjusting these settings will help maintain a reliable connection tailored to your needs. Empowering yourself with this knowledge not only ensures a better internet experience but also protects your network from potential threats. By following this guide, you can take control of your home or office Wi-Fi network with confidence.
Ip 192.168.100.1 kok tidak bisa di akses… Saya pake hp android ( Chrome)
Mau Restart/kembali Ke Pengaturan Pabrik