Daftar Isi ⇅
show
Change Settings with 192.168.l.1: A Simple Guide
Accessing your router settings is crucial for managing and optimizing your network. Whether you need to change your Wi-Fi password, set up parental controls, or customize other network settings, understanding how to navigate your router’s configuration is essential. One common method is through the IP address 192.168.l.1. In this guide, we’ll walk you through the steps to access your router’s settings via this IP address and provide tips on how to troubleshoot common login issues. Let’s dive in and ensure your network runs smoothly and securely, allowing you to make the most of your internet connection.
What is 192.168.l.1?
The IP address 192.168.l.1 is referred to as a private or gateway IP. It’s part of a reserved range used by routers to route local traffic within a home or office network. Unlike a public IP address, which is unique and visible on the internet, a private IP like 192.168.l.1 is confined to local networks only. Manufacturers often assign the same default gateway IP to their routers, and this IP is not unique to each device. Brands such as Huawei, Linksys, D-Link, Asus, Netgear, and TP-Link commonly use 192.168.l.1. This IP address is a critical part of managing your network. It allows you to access the router’s admin panel, where you can configure settings, manage connected devices, and secure your network. Despite its simplicity, the address can sometimes be mistyped, leading to login issues which we’ll cover in this guide.
How to Access the 192.168.l.1 Login Page?
Steps to Log In
First, open your web browser and type in http://192.168.l.1 in the URL bar. Second, you’ll be prompted to enter your router’s default username and password. If you’ve never changed them, you can find the default credentials on the router’s label or the manufacturer’s website. Third, once logged in, you’ll have access to the router’s admin panel.
Troubleshooting Login Issues
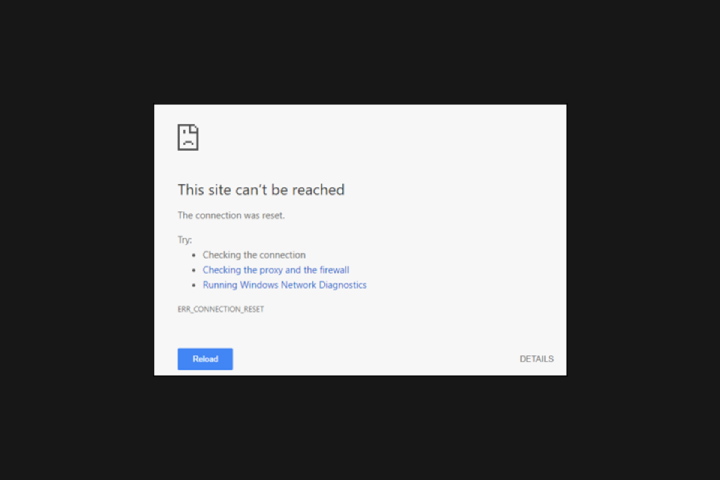
If you’re unable to access the login page, ensure that you’re entering the IP address correctly. Typing errors are common, such as mistaking ‘l’ for ‘1’. If the problem persists, try restarting your router and clearing your browser’s cache. Double-check connections between your router and modem, ensuring that all cables are securely plugged in. Sometimes, using a different browser can solve the issue. If these steps don’t work, your router might not use 192.168.l.1 as its gateway IP. In that case, consult your router’s documentation or visit the manufacturer’s website for assistance on finding the correct IP address.
Once logged into the router’s admin panel, you’ll see various menus and options. The interface can vary between models, but common sections include Network, Wireless, Security, and Advanced Settings. Start by exploring the Network section, which shows connected devices and IP assignments. Here, you can change your router’s IP address or set up DHCP reservations. The Wireless section allows you to configure your Wi-Fi network, including SSID (network name) and password. In the Security section, you can enable WPA3 encryption for enhanced security or set up a guest network for visitors. Advanced Settings often contain options for port forwarding, Quality of Service (QoS) that prioritizes bandwidth for critical devices, and firewall configurations. Make sure to study each section before making changes. Improper settings can disrupt your network. If you’re unsure about a setting’s function, consult the router’s user manual or look it up on the manufacturer’s support site.
Common Settings You Can Change
The Wi-Fi settings are among the most frequently adjusted configurations. You can change the network name (SSID), Wi-Fi password, and encryption type. Use WPA3 if available, as it offers the best security. After making your changes, click Save to apply them. Adjusting security settings can greatly enhance your network’s safety. Change the default router login credentials, enable firewall protection, and configure parental controls. Regularly updating your router’s firmware can also prevent security vulnerabilities. Always save changes before exiting the admin panel.
How to Save Changes and Reboot?
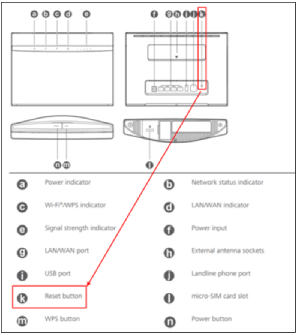
After making any changes, it’s important to save them to ensure they take effect. Most routers have a Save or Apply button in each configuration section. After saving, you might need to reboot the router for the changes to apply fully. To reboot through the admin panel, look for a Reboot option, usually under System settings. Alternatively, you can manually reboot by unplugging the router’s power cable, waiting about a minute, and then plugging it back in. Manual reboots can resolve connectivity issues and help the router apply settings cleanly. Avoid pressing the physical Reset button unless necessary, as it often triggers a factory reset, erasing all custom settings.
Conclusion
Managing your router settings through 192.168.l.1 empowers you to optimize and secure your network to suit your needs. Understanding how to navigate the admin panel, troubleshoot login issues, and customize key settings like Wi-Fi configuration and security is essential. Remember to save changes and reboot the router to solidify your adjustments. Regular maintenance, such as updating firmware and changing passwords, will keep your network running smoothly and securely. Follow the steps outlined in this guide, and you’ll be well on your way to mastering your router settings.